


Product Description
Upgrade Your Engine Bay Lighting with Our Convenient Service Light Kit!
Are you tired of struggling with a phone light or torch every time you need to check something under the hood? Say goodbye to inconvenient lighting solutions and welcome our Service Light Kit, designed specifically for:
- Compatible with 2020-2025 Isuzu D-Max
- Compatible with 2020-2025 Mazda BT-50
- Compatible with 2021-2025 Isuzu Mu-X
Here's why our kit is a must-have for every vehicle owner:
-
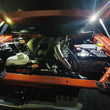
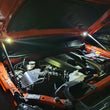
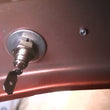
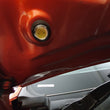
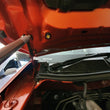
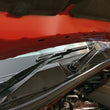
Tailored Design: Our kit is meticulously designed to fit perfectly into the under bonnet location holes of the 2021 D-Max and similar models. While it's optimised for these vehicles, it can also be adapted for use in other vehicles with ease.
-
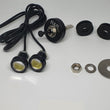
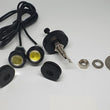
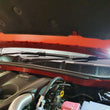
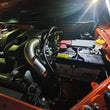
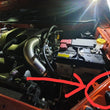
Comprehensive Components: The kit includes everything you need for a professional-grade lighting setup. You'll receive two LED lights, custom-made rubber grommets, a pressure switch, and all the necessary hardware and spacers for installation.
-
Customisable Wiring: While our kit provides the essential components, please note that it does not include wiring, inline fuse, or connections. You'll have the flexibility to customise the wiring according to your specific requirements. Simply source positive/negative cables, approximately 2m in length, along with 12v connectors or soldering, an inline fuse, and a conduit cover.
-
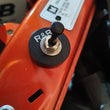
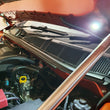
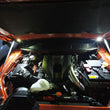
Easy Installation: Installing our kit is a breeze! Follow the step-by-step fitting instructions provided in our video link (https://youtu.be/-jVz9F7WOSw) to complete the installation process. Fit the rubber grommets, feed the cables through, mount the LED lights, connect the wires, and mount the pressure switch for seamless operation.
-
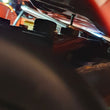
Convenient Operation: Once installed, the pressure switch will automatically activate the LED lights whenever the bonnet is opened, providing instant illumination for your engine bay. No more fumbling around in the dark – our kit ensures that you have clear visibility whenever you need it.
Upgrade your engine bay lighting with our Service Light Kit and enjoy effortless maintenance and enhanced visibility. Illuminate your engine bay with ease and convenience – order yours today!
Note
There’s a possibility that moisture or water ingress—especially from pressure washing—could interfere with the switch’s performance, causing a poor earth connection or even sticking the switch in place. We advise against pressure washing near the LED lights as these are not designed for water pressure and the Led covers might fall of if exposed to it. Also keep moisture away from the switch. If the switch does get wet, a water-displacing spray like WD-40 is recommended to help restore proper function.
Shipping Policy
Orders are processed within 1-2 business days and typically delivered within 3-7 business days. For more information, please visit our Shipping Policy page.
Returns Policy
We accept returns within 30 days of purchase. Products must be unused and in original packaging. For detailed return instructions, please visit our Returns Policy page.

Exclusive Wholesale Pricing
Unlock tiered pricing, volume discounts, and bulk order incentives built specifically for auto professionals.

Safe & Secure Payment
All transactions are protected with advanced encryption and secure gateways. Shop worry-free with trusted payment methods.

Custom Orders & Bundles
Request custom kits or bulk packages tailored to your shop's needs and seasonal trends.

100% Genuine Products
We supply only OEM and high-quality aftermarket parts you can trust — no compromises on quality or performance.